在本教程中,我们将向您展示如何在 Debian 11 上安装 phpPgAdmin。对于那些不知道的人,phpPgAdmin 是一个免费的基于 Web 的管理工具,用于管理 PostgreSQL 数据库。 它允许您执行创建、修改和删除数据库、表、视图、字段等活动。 PhpPgAdmin 是用 PHP 编写的,它使 PostgreSQL 数据库的管理更容易,更不用说基于 Web 的 GUI 使一切都更加用户友好和易于使用。
本文假设您至少具备 Linux 的基本知识,知道如何使用 shell,最重要的是,您将网站托管在自己的 VPS 上。 安装非常简单,假设您在 root 帐户下运行,如果不是,您可能需要添加 ‘sudo‘ 到命令以获取 root 权限。 我将向您展示在 Debian 11 (Bullseye) 上逐步安装 phpPgAdmin。
在 Debian 11 Bullseye 上安装 phpPgAdmin
第 1 步。在我们安装任何软件之前,重要的是通过运行以下命令确保您的系统是最新的 apt 终端中的命令:
sudo apt update sudo apt upgrade
步骤 2. 安装 Apache 网络服务器。
现在我们安装 Apache 通过运行以下命令在 Debian 系统上运行 Web 服务器:
sudo apt install apache2 apache2-utils
确认 Apache 构建和版本:
apache2 -v
在开始配置之前,请确保 Apache 服务正在您的系统上运行。 运行以下命令检查 apache 服务状态:
sudo systemctl status apache2 sudo systemctl start apache2 sudo systemctl enable apache2
步骤 3. 安装 PostgreSQL。
默认情况下,不能直接从 Debian 11 基础存储库安装 PostgreSQL。 现在我们将官方 PostgreSQL 存储库添加到您的系统:
echo "deb [signed-by=/usr/share/keyrings/postgresql-keyring.gpg] https://apt.postgresql.org/pub/repos/apt/ bullseye-pgdg main" | sudo tee /etc/apt/sources.list.d/postgresql.list
接下来,导入 PostgreSQL 签名密钥:
curl -fsSL https://www.postgresql.org/media/keys/ACCC4CF8.asc | sudo gpg --dearmor -o /usr/share/keyrings/postgresql-keyring.gpg
最后,运行以下命令安装 PostgreSQL:
sudo apt update sudo apt install postgresql-13
安装 PostgreSQL 后,启动 PostgreSQL 服务并使其在系统重新启动时启动:
sudo systemctl start postgresql sudo systemctl enable postgresql sudo systemctl status postgresql
步骤 4. 在 Debian 11 上安装 phpPgAdmin。
现在 phpPgAdmin 软件包也可以在默认的 Debian 存储库下使用。 使用以下命令安装 phpPgAdmin:
sudo apt install phppgadmin
步骤 5. 配置 phpPgAdmin。
接下来,现在我们编辑 phpPgAdmin 配置文件以添加 PostgreSQL 实例:
sudo nano /etc/phppgadmin/config.inc.php
添加以下文件:
// Display name for the server on the login screen $conf['servers'][0]['desc'] = 'PostgreSQL 13'; // Hostname or IP address for server. Use '' for UNIX domain socket. // use 'localhost' for TCP/IP connection on this computer $conf['servers'][0]['host'] = 'localhost'; // Database port on server (5432 is the PostgreSQL default) $conf['servers'][0]['port'] = 5432;
将 extra_login_security 值设置为 false:
$conf['extra_login_security'] = false;
步骤 6. 配置 Apache.
创建一个新的 Apache phpPgAdmin 的配置文件:
sudo nano /etc/apache2/conf-enabled/phppgadmin.conf
修改以下行:
. . . . . . </IfModule> AllowOverride None # Only allow connections from localhost:Require all granted <IfModule mod_php.c> . . . . . .
Save 和 close,然后重新启动 Apache 网络服务器,以便进行更改:
sudo systemctl restart apache2
步骤 7. 访问 PhpPgAdmin Web 界面。
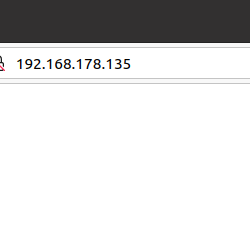
成功安装后,打开 Web 浏览器并使用 URL 访问 PhpPgAdmin Web 控制台 https://your-server-ip-address/phppgadmin. 您应该看到 PhpPgAdmin 界面:
恭喜! 您已成功安装 phpPgAdmin。 感谢您使用本教程在 Debian 11 Bullseye 上安装最新版本的 phpPgAdmin。 如需更多帮助或有用信息,我们建议您查看 phpPgAdmin 官方网站.